Welcome The Light
Let's explore together

Sign up for my newsletter for free lightroom and photoshop classes. presets, actions, and more

Passion, Freedom, Adventure, Fulfillment, and Joy. That is just some of what photography offers. Sharing the experience with others is the reward. This blog is a collection of stories, tutorials, and insights I have gained in my exploration of light.

Ferruginous Pygmy Owl II

December 10, 2018  •  Leave a Comment

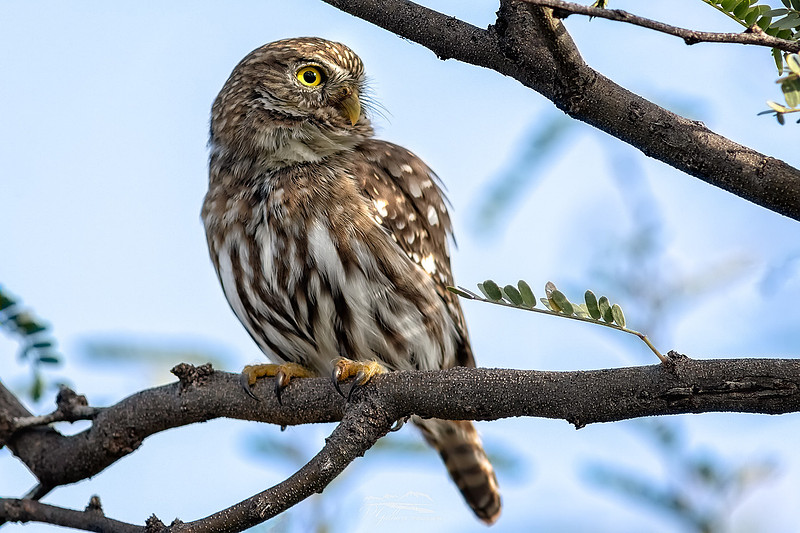
Ferruginous Pygmy Owl IIFerruginous Pygmy Owl IISouthern Texas and Arizona represent the northernmost border of the Ferruginous Pygmy-Owls (FEPO) range. Abundant below 4,000 feet throughout both the eastern and western coastal areas of Mexico they are a ferocious predator of lizards, small songbirds and earthworms. Once across the border they are more frequently found in Texas than in Arizona. In 1997 they were listed as endangered in southern Arizona. This designation was erroneously removed in subsequent years.

As Tony, Bryan and I were enjoying our time photographing the owl in the barren ranchland of western Tuscon we discussed why more FEPO's were not seen here. Estimates project that there are between twenty to fifty breeding pair from Tucson south but those numbers could be low. The habitat is every bit as welcoming as that in Texas and Mexico, and there is ample food to sustain them. We hoped that they are probably here but in terrain too tricky for most birders to navigate.

Similar in size and jizz to the Northern Pygmy-Owl (NPOW) the best way to distinguish the two species apart is by the head and tail. The NPOW has a spotted head and whitish banding on the tail, while the FEPO's head markings are more streaky and the tail banding more rufous. I selected to post this image to highlight these markings. Of course, the best way to tell if you are seeing a FEPO is by finding the stunningly alluring eyes in the back of its head! I will post an image that highlights that feature tomorrow.

I have read that the sky island region of southern Arizona has the most significant diversity of animals in the united states. One year into our move here I am discovering this to be true. Anyone willing to do a bit of exploring can be rewarded with new species daily. I see this to be an immense testimony to the greatness and artistry of God. I am blessed to be its witness and humbled to be its scribe.
Shoot Date: December 8, 2018
Canon EOS 5D Mark IV
Shutter priority ¹⁄₅₀₀ sec at f/5.0 0 EV
Lens: EF400mm f/2.8L USM @ 400 mm
ISO: 100

Ferruginous Pygmy-Owl II

Southern Texas and Arizona represent the northernmost border of the Ferruginous Pygmy-Owls (FEPO) range. Abundant below 4,000 feet throughout both the eastern and western coastal areas of Mexico they are a ferocious predator of lizards, small songbirds and earthworms. Once across the border they are more frequently found in Texas than in Arizona. In 1997 they were listed as endangered in southern Arizona. This designation was erroneously removed in subsequent years. 


As Tony, Bryan and I were enjoying our time photographing the owl in the barren ranchland of western Tuscon we discussed why more FEPO's were not seen here. Estimates project that there are between twenty to fifty breeding pair from Tucson south but those numbers could be low. The habitat is every bit as welcoming as that in Texas and Mexico, and there is ample food to sustain them. We hoped that they are probably here but in terrain too tricky for most birders to navigate. 


Similar in size and jizz to the Northern Pygmy-Owl (NPOW) the best way to distinguish the two species apart is by the head and tail.  The NPOW has a spotted head and whitish banding on the tail, while the FEPO's head markings are more streaky and the tail banding more rufous. I selected to post this image to highlight these markings. Of course, the best way to tell if you are seeing a FEPO is by finding the stunningly alluring eyes in the back of its head! I will post an image that highlights that feature tomorrow. 


I have read that the sky island region of southern Arizona has the most significant diversity of animals in the united states. One year into our move here I am discovering this to be true.  Anyone willing to do a bit of exploring can be rewarded with new species daily. I see this to be an immense testimony to the greatness and artistry of God. I am blessed to be its witness and humbled to be its scribe. 


©RGallucci Photography

---

Shoot Date: December 8, 2018
Canon EOS 5D Mark IV
Shutter priority ¹⁄500 sec at f/5.0 0 EV
Lens: EF400mm f/2.8L USM @ 400 mm
ISO: 100


Ferruginous Pygmy-Owl I

December 09, 2018  •  Leave a Comment

Ferruginous Pygmy OwlFerruginous Pygmy OwlIn general, Owls are an elusive species to find and photograph in the wild. Most are either nocturnal or crepuscular, making locating them during the day a challenge. This is all the more true with the pygmy and small owls. Most of the members of this clan measure around six inches in height, making finding them in a tree even more difficult. I well remember my first experience with a Northern Saw-whet Owl. It was perched a foot directly over my head yet still invisible to me.

But that was not the case yesterday when we went on a wild adventure into the high southern desert to find the rare (in the USA) Ferruginous Pygmy Owl. Mostly seen in south Texas, the chance to see this life bird in Arizona was too tempting to resist. We traveled three hours from the southernmost part of Arizona to the Black Hills west of Tuscon only to find ourselves at a junction to a primitive road. Residents of Arizona are very familiar with primitive roads. They come in many states of primitive from well-groomed dirt highways to rocky thoroughfares that require slow and careful navigation. But for the road ahead of us on the next leg of this journey the term primitive would be an upgrade. We were concerned about continuing.

Stopping to survey the terrain and rest a moment we received a good omen. Ahead of us, perched on the dead scrag of a tall tree, was two Crested Caracara. With our spirits buoyed by this sighting we plunged ahead. After five miles of slow off-camber driving along the rocky, well-rutted route we arrived at the location where another birder had reported the owl. We had planned to spend hours in search but had only gone about 20 minutes when from the bowels of a stand of trees we heard the unmistakable faint hoots of the owl. With three sets of eyes present, we set upon the task of narrowing our search perimeter. A short while later we spotted the bird.

At a diminutive 6 inches tall the Ferruginous Pygmy-Owl is only defeated for the title of the smallest owl by the even smaller Elf Owl. But our bird had decided to perch in the open space of a bare limb making him loom large. Staying a respectful distance away from the Owl we set up our gear to take our photos.

Rutilant in the morning light, the bird treated us to a show of song and movement for over an hour. A short while after we had begun we heard the reason for the calls. There was a second owl somewhere in the area. A quick 1,000 images later we packed up and headed home.

I will post more images and video of this beautiful bird over the next few days, including some shots of one of its most distinguishing features - the eyes on the back of its head. I was as interested in getting good shots of that as I was of his face.

A day spent with good friends is a blessing. Finding rare species makes it more so. There are no words that I know that can adequately describe the gratitude I feel towards God for allowing me these privileges. I humbly remain His scribe.
Shoot Date: December 8, 2018
Canon EOS 5D Mark IV
Shutter priority ¹⁄₁₂₅ sec at f/5.6 1 ²⁄₃ EV
Lens: EF400mm f/2.8L USM @ 400 mm
ISO: 100

In general, Owls are an elusive species to find and photograph in the wild. Most are either nocturnal or crepuscular, making locating them during the day a challenge.  This is all the more true with the pygmy and small owls. Most of the members of this clan measure around six inches in height, making finding them in a tree even more difficult. I well remember my first experience with a Northern Saw-whet Owl. It was perched a foot directly over my head yet still invisible to me.


But that was not the case yesterday when we went on a wild adventure into the high southern desert to find the rare (in the USA) Ferruginous Pygmy Owl. Mostly seen in south Texas, the chance to see this life bird in Arizona was too tempting to resist. We traveled three hours from the southernmost part of Arizona to the Black Hills west of Tuscon only to find ourselves at a junction to a primitive road. Residents of Arizona are very familiar with primitive roads. They come in many states of primitive from well-groomed dirt highways to rocky thoroughfares that require slow and careful navigation. But for the road ahead of us on the next leg of this journey the term primitive would be an upgrade. We were concerned about continuing. 


Stopping to survey the terrain and rest a moment we received a good omen.   Ahead of us, perched on the dead scrag of a tall tree, was two Crested Caracara. With our spirits buoyed by this sighting we plunged ahead. After five miles of slow off-camber driving along the rocky, well-rutted route we arrived at the location where another birder had reported the owl. We had planned to spend hours in search but had only gone about 20 minutes when from the bowels of a stand of trees we heard the unmistakable faint hoots of the owl. With three sets of eyes present, we set upon the task of narrowing our search perimeter. A short while later we spotted the bird.  


At a diminutive 6 inches tall the Ferruginous Pygmy-Owl is only defeated for the title of the smallest owl by the even smaller Elf Owl. But our bird had decided to perch in the open space of a bare limb making him loom large. Staying a respectful distance away from the Owl we set up our gear to take our photos. 


Rutilant in the morning light, the bird treated us to a show of song and movement for over an hour. A short while after we had begun we heard the reason for the calls. There was a second owl somewhere in the area. A quick 1,000 images later we packed up and headed home. 


I will post more images and video of this beautiful bird over the next few days, including some shots of one of its most distinguishing features - the eyes on the back of its head. I was as interested in getting good shots of that as I was of his face. 

A day spent with good friends is a blessing. Finding rare species makes it more so. There are no words that I know that can adequately describe the gratitude I feel towards God for allowing me these privileges. I humbly remain His scribe. 


---


Shoot Date: December 8, 2018
Canon EOS 5D Mark IV
Shutter priority ¹⁄125 sec at f/5.6 1 ²⁄3 EV
Lens: EF400mm f/2.8L USM @ 400 mm
ISO: 100


Miller Mountain Milky Way - How I shot it

November 05, 2018  •  Leave a Comment

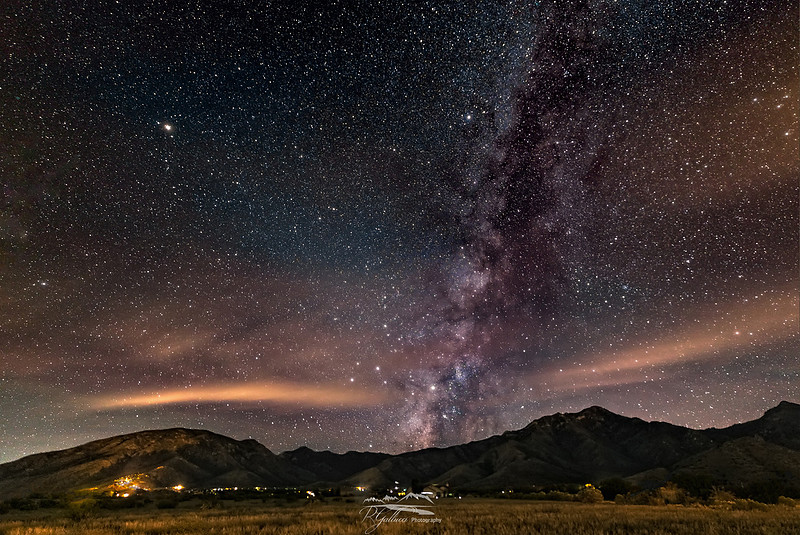
Miller Mountain Milky WayMiller Mountain Milky WayI was outside grilling steaks when my beautiful wife told me to look towards the Huachuca mountains. Apparently, someone had forgotten to tell the Milky Way that the season was over. Not one to pass up an opportunity to showcase God's beautiful universe I set up my camera and took some shots. Each day in this desert paradise I am presented with new opportunities to wonder at the glory of His creation. I am truly blessed and humbled to be His witness.
Shoot Date: November 3, 2018
Canon EOS 5D Mark IV
30.0 sec at f/2.5 0 EV
Lens: 15mm @ 15 mm
ISO: 2500

How I shot this photo (Milky Way Stacking)    
Equipment / Software
Canon 5D IV
Irix 15mm 2.4 Lens
MeFoto Traveller Tripod
Vello Intervalometer
Photopills iPhone App
Starry Landscape Stacker
Lightroom
Photoshop
RayaPro
On1 PhotoRaw
DXO NIK Software
---
The goal in Milky Way, or any night photography, is to capture the most amount of light with the least amount of noise.  There are many tools and techniques to accomplish this. My favorite is Star Stacking, which is taking multiple images (Light Frames) sequentially and then using software to combine them. This can be accomplished in Photoshop, but that is labor intensive. There is a specialty software for MAC owners, Starry Landscape Stacker, that makes the process much more manageable. It is the software I use in almost all of my Milky Way images.  

Here is how I capture single frame Milky Way images. Capturing Pano's of the entire Milky Way utilizes different techniques and equipment. 

Equipment
On the hardware side, using a camera that is capable of shooting at a high ISO without noise is a great start. One of the advantages of modern camera technology is that they can shoot at higher ISO's without noise. My Canon 5D IV can easily shoot at ISO 6400 at night without considerable noise. A wide, fast (f2.8 and lower) lens is also a significant advantage. My go-to lens is the IRIX 15mm f2.4. It has proven to be a workhorse for night shots and also doubles as a great lightning/storm lens during monsoon season. Getting Milky Way photos with slower lenses is possible. I shot the Milky Way with a Canon 16mm f4 lens for years, but a faster lens allows you to capture more light in a shorter time, thus minimizing noise. A tripod, or some other stable support, is essential. There is no way to capture the night sky at the shutter speeds required without the camera on a stable platform. The final piece of hardware needed for this technique is an Intervalometer. This is a cable release device that allows you to program a timer that releases the camera shutter at set intervals for set periods of time. The intervalometer is essential in star stacking, especially if you will try to further reduce noise by using Dark Frames. Dark Frames are images shot at precisely the same settings as Light Frames but with the lens cover on the camera. 

If you are only shooting a single exposure at a longer shutter speed and higher ISO the intervelometor is not required. For a single image, a simple cable release works well, as does setting your camera to use its internal 2-second timer. The purpose of the cable release or timer method is to minimize camera shake when pressing the shutter. 

Planning
The Milky Way Season, the time when the core (Galactic Center) of the Milky Way is visible above the horizon, is from late May through October. June and July are the best times to shoot. In the Northern Hemisphere it appears in the SouthEast during spring, South in Summer and SouthWest in the fall.  This is essential information for planning your shooting locations. There are still opportunities to capture great Milky Way shots in late April and early May, but the window to shoot is incredibly short, and you may not get the entire galactic center. 

Whether I am mapping out a Milky Way shot in advance, my preferred method, or shooting an impromptu shot, as in this image, I always begin with PhotoPills.  I do not believe there is a better, or more important, app for Milky Way shootings than PhotoPills. In fact, in almost every shooting situation, including wildlife shooting, PhotoPills is an essential tool for capturing a great shot. Going into all its capabilities is beyond the scope of this post, but I will be offering PhotoPills clinic and workshops in 2019. Full disclosure - I am a PhotoPills Master, and my images have won numerous awards from the company. 

PhotoPills has many critically important tools for Milky Way shooting. The ones I use most frequently are the Planner module, which lets me know when and at what time the Milky Way will be visible, as well as the Night Augmented Reality feature which enables me to envision the Milky Ways position at a future time, even if it is daylight. The other critically important panel in the application is the Spot Stars module. This allows me to enter my Camera model, lens length and aperture to provide me with the optimal exposure time for the image. For planned shoots where I am capturing the foreground during the blue hour, the HyperFocal Module with its Augmented Reality feature allows me to get the maximum exposure focus from front to back. 

Capturing the Stack
Once I have planned the shot and set up my camera I will always take a test shot using a long exposure and high ISO. My goal is to capture an image that I can easily review on my camera's screen. Typically this is a 30-second exposure at ISO 3200. A quick note about 30/3200. This is the default setting many Milky Way newcomers use. It is written about frequently and produces acceptable images. I strongly recommend not using these settings. Find out what the optimal exposure / ISO is for your camera set up and use that. You will be much happier with the results. 

After reviewing my test shot and making adjustments to the composition, I program my Intervelometer to shoot 20 light frames and let it go. As soon as the image sequence is complete, and careful not to move anything, I put the lens cap on the camera and shoot 20 more images.  Note, that 20 images in the maximum number of images Starry Landscape Tracker can handle and no the essential amount of shots needed. Getting great results with as few as five images is possible. I am just a bit OCD about it. The key is that you take as many dark frames as light frames. 

I will typically shoot the Milky Way in both Landscape and Portrait mode to give myself options on which images I like best. 

Capturing the Foreground
The foreground element in a Milky Way shot is as important as the Milky Way itself. It anchors the image and provides visual distinction to the final composition. Using the minimum amount of time and lowest ISO will not give enough exposure to illuminate the foreground properly. The best way to capture the foreground is to plan the shot in PhotoPills in advance and get to your shooting location while it is still light.  The software will tell you exactly when both Golden and blue hour happen. Once the sun sets below the horizon, the time called the blue hour; there is still sufficient light to capture the foreground in detail. This is one of my favorite times to shoot in general and is often overlooked by other photographers.  I will cover shooting the foreground in advance in my Milky Way clinics and workshops. 

If you find yourself in a situation where you cannot get to the location while there is still light to capture the foreground do not be dismayed. You can still obtain a great foreground using the proper techniques.  One thing to remember, while shooting the Milky Way during a full moon is not really possible, it is possible to shoot during different phases of the moon. Moonlight is bright as the sun and offers a great lighting source, even when it is below the horizon.  I will cover this in my clinics and workshops as well. 

At other times the key is taking multiple exposures with long shutter speeds and high ISO. These images will be noisy but using simple photo stacking can eliminate much of the noise while retaining enough detail to make the picture visually compelling. In the image above I had the benefit of a lot of ambient light and some minimal moonlight in the background. I shot five photos of the foreground at a 30-second exposure at ISO 2500. I often shoot foregrounds for as long as a minute at ISO 3200 or 6400. 

Putting it all together
I use Adobe Lightroom as my starting point for all images.  Once I have them in my catalog the first thing I do is make a lens correction and eliminate chromatic aberration on one image. I then sync this adjustment to all my pictures, even the dark frames. Then I decide which series I like best and prepare those to be stacked in Starry Landscape Stacker. I make adjustments to the first image in the series and sync the changes across the rest. This is when I will crop the photo. Since I try to shoot at the fastest shutter and lowest ISO I can, my images are typically dark. My first goal is to lighten them to make the highest amount of stars visible. I am not worried about noise because stacking other post-processing techniques will eliminate it. Each image series is unique, but most often I will increase the exposure, shadows, and whites while decreasing the blacks and contrast. This does not give me an image I would want to publish, but one that the stacking software can analyze most effectively. I usually shoot my pictures at a Kelvin of 3800 which works for my area, but I will also adjust my white balance at this point in the process. I then export the series to my hard drive and import it into Starry Landscape Stacker. Use of that software is beyond the scope of this post, but primarily I select the sky area and let the software do its work. The result is an image with all the stars aligned and most of the noise removed. The software will also produce a separate with the foreground masked out. I usually export this image as well. I then import that image back into Lightroom where I make necessary adjustments. 

Once those adjustments have been completed, I send the image to Photoshop. 

I will then work on my foreground images. I use mostly the same process as I do for the sky, this time focusing on making the foreground adequately exposed. I have two methods for stacking the foreground images. I will either use Starry Landscape Stacker or Photoshops median stacking. Either way, I end up with a final image ready to be merged with the sky image. 

Merging images is an art in itself. The first step is to stack the sky and the foreground as separate layers in photoshop. Once this is done, they must be aligned. If you have done everything right and not moved the camera while shooting the alignment is easy.  

Then they must be combined into one image. One of the simplest methods, but one which I do not use, is to use the masked image produced by Starry Landscape Stacker to create a mask on the sky image revealing the foreground image below. My experience is that this method creates a distinct line between the photos. My goal is to create a feathered blend that is seamless. The most effective way to do this is to use RayaPro to produce a luminosity mask that blends the images. Luminosity Masking is an advanced photoshop technique. I may one day offer a clinic on it, but the creator of RayaPro has created some of the most excellent youtube training tutorials I have ever seen. Most of them are free. There are other methods for blending the images, and the key is to find the one that works best for you. 

Now that I have the composite complete it needs to be edited. The first thing I do is run DXO software define module. This eliminates any remaining noise in the sky. I will then typically run DXO Color Efex module details, Pro Contrast, and Tonal Adjustments. I try to go very light on these. I will then bring the image into On1 PhotoRaw where I add a very light glow to the sky, a very soft vignette and if needed, some Dynamic Contrast. I export the image back into photoshop and make any other adjustments needed to levels, curves, etc. I will often make specific adjustments using RayaPro to isolate particular areas to enhance detail, saturation, hue, levels, and curves. 

I now have my final image. By this point, it is a large file.  I will save it and then duplicate it. I rename the duplicate to my final image name and then merge all the layers to make the file smaller. If needed this is when I will resize the image for printing. I then use RayaPro to create a separate 2048 pixel wide image sharpened for social media. I save both these files into Lightroom. The last thing I do before publishing is writing the image story.  But that is a story in itself. I hope this helps to get you started on Milky Way Photography. 


Calm and Fury

July 09, 2018  •  1 Comment

Calm and FuryCalm and FuryOften when I look at nature unfold before me, I am reminded that the world can be a macro example of the microcosm of life.

Often when I look at nature unfold before me, I am reminded that the world can be a macro example of the microcosm of life.  This was the case as I watched the recent storm over the Mule Mountains. It was a revelation that invited me to reflect on the duality of emotions  I feel during times of uncertainty and chaos. 

Here, playing out before my eyes, was nature at its most extreme. As the sky roiled above, explosions of tentacled lightning erupted from the bloated bellies of ion-charged clouds, hell-bent on reducing anything below to ash and ruin. As grand as it was to watch, it was humbling to concede the powerlessness I had to do anything about it. Sometimes life is like that as well.  A storm of destruction passes through our existence with little to nothing we can do to mitigate it. We are as spectators in a circus of ruin, rubes in the carnival of helplessness.  

There are times, especially in the midst of the storm, that that is all we see. And, If that were all there was it would be a bleak life indeed. But, in the same scene, above the fury that raged below, through a hole in the clouds, the eternal heavens with their beaconing lights of hope, shone brightly. A view of forever illuminated by endless guiding lights that calmly stood in a constant vigil of strength and faith.  It could be easy to miss if I had focused only on the storm. I am blessed that I was given an opening to see it. 

 And, as it is in nature, it is in life, there are times when we are in the middle of a storm that we forget that it will pass. Eventually, all storms give way to the calm that surrounds them. When we are lucky, we can glimpse that calm amidst the confusion to anchor us to the hope of the future. It is in that belief that we continue in our great exploration of a life well lived. 

Had we not moved to Arizona I might never have had the fortune to witness this scene. Had we not moved here I could not scribe the lesson God provided through this world, His grandest palette. For that, I am truly thankful and blessed. 


Lightning over Mule Mountains

July 07, 2018  •  Leave a Comment

Lightning over Mule MountainsLightning over Mule MountainsThere is the world. Every day we rush through it in a circular race to nowhere, while all around us, unfolding like a million miracles, nature screams for us to stop and look at her wonder. One of the greatest joys of having moved from the northeast, with its turbocharged pace, to this arid high desert, is the ability to see stop more often to see Gods wonder around me. It is in this place, this arid desert, that I have found a beauty that is sublime in its grace.

There are the flaxen fields, whose windswept motion makes them seem like landlocked oceans, that stretch for miles before striking distant mountain shorelines. There are the mountains; not the continent traversing mammoths of the Rockies, not the coastal crags of the Appalachian range, or the rolling blues below them. No, these mountains are islands, improbably jutting from the earth with no rhythm or symmetry, like stepstools to the typically tranquil crystal blue skies. Skies that, for most of the year remain unadorned, allowing sunrises and sunsets to paint the horizon in hues of purple and pink. Every day there is a breeze. Every day there is sunshine. It is paradise.

Yet even paradise must pay the price for its existence. Even the desert needs water to survive. So for two months each year, on an almost daily basis, paradises thirst is quenched by violent squalls of torrential rains from bloated clouds filled with spectacular lightning. Until tonight I had only just heard about the wonder of these storms. Until tonight I had not experienced their greatness.

As I stood in the field in front of my house I watched, transfixed and awed, by the display of power unleashed by the sky. I had never seen a storm like this. A storm that stalled for over an hour on top of the Mule Mountains emitting a steady stream of lightning that surpassed any July 4th show. It was glorious and yes, even in its violence, it was paradise.

This is the first "real" lightning photograph I have taken. I have captured an occasional flash, but never have I been ready with a camera to bear witness to the awesome power of Gods fireworks. I hope to have many more experiences to stand as scribe to this incredible phenomena. This shot is a single, four-minute exposure that captured five flashes of light over the Mule Mountains and Naco.
Shoot Date: July 7, 2018
Canon EOS 5D Mark IV
239.0 sec at f/4.0 0 EV
Lens: EF16-35mm f/4L IS USM @ 16 mm
ISO: 200

There is the world. Every day we rush through it in a circular race to nowhere, while all around us, unfolding like a million miracles, nature screams for us to stop and look at her wonder. One of the greatest joys of having moved from the northeast, with its turbocharged pace, to this arid high desert, is the ability to see stop more often to see Gods wonder around me. It is in this place, this arid desert, that I have found a beauty that is sublime in its grace. 

There are the flaxen fields, whose windswept motion makes them seem like landlocked oceans, that stretch for miles before striking distant mountain shorelines.  There are the mountains; not the continent traversing mammoths of the Rockies, not the coastal crags of the Appalachian range, or the rolling blues below them.  No, these mountains are islands, improbably jutting from the earth with no rhythm or symmetry, like stepstools to the typically tranquil crystal blue skies. Skies that, for most of the year remain unadorned, allowing sunrises and sunsets to paint the horizon in hues of purple and pink. Every day there is a breeze. Every day there is sunshine. It is paradise. 

Yet even paradise must pay the price for its existence. Even the desert needs water to survive. So for two months each year, on an almost daily basis, paradises thirst is quenched by violent squalls of torrential rains from bloated clouds filled with spectacular lightning.  Until tonight I had only just heard about the wonder of these storms. Until tonight I had not experienced their greatness.  

As I stood in the field in front of my house I watched, transfixed and awed, by the display of power unleashed by the sky. I had never seen a storm like this. A storm that stalled for over an hour on top of the Mule Mountains emitting a steady stream of lightning that surpassed any July 4th show.  It was glorious and yes, even in its violence, it was paradise. 

This is the first "real" lightning photograph I have taken. I have captured an occasional flash, but never have I been ready with a camera to bear witness to the awesome power of  Gods fireworks. I hope to have many more experiences to stand as scribe to this incredible phenomena.  This shot is a single, four-minute exposure that captured five flashes of light over the Mule Mountains and Naco. 
 

Subscribe
RSS
Archive
January February March April May June July August September October November (1) December
January February March April May June July August September October November December
January February March April May June July August September (1) October November December
January February March April May (1) June July (1) August (1) September October November December (1)
January February March (1) April May June (2) July (2) August September October November (1) December (13)
January (13) February (9) March (1) April (3) May June (6) July August September October November December (13)
January February March April May June July August September October (1) November December
January (1) February March April May June July August (1) September October (1) November December
January February March April May June July August September October November December